JustAVPS Docs
24/7 always-on sandboxes for AI agents. Use it as your personal dev machine, or provision sandboxes programmatically as infrastructure.
Getting Started#
Get a machine running in minutes.
Choose a machine
Pick a plan from the landing page or dashboard. Starter (2 vCPU / 4 GB), Pro (4 vCPU / 8 GB), Power (8 vCPU / 16 GB), or Ultra (16 vCPU / 32 GB). Choose your region (EU Central or US West).
Deploy
Click Deploy. Your machine provisions in 1–3 minutes. You get a dedicated IP, SSH key, and an authenticated subdomain for every port.
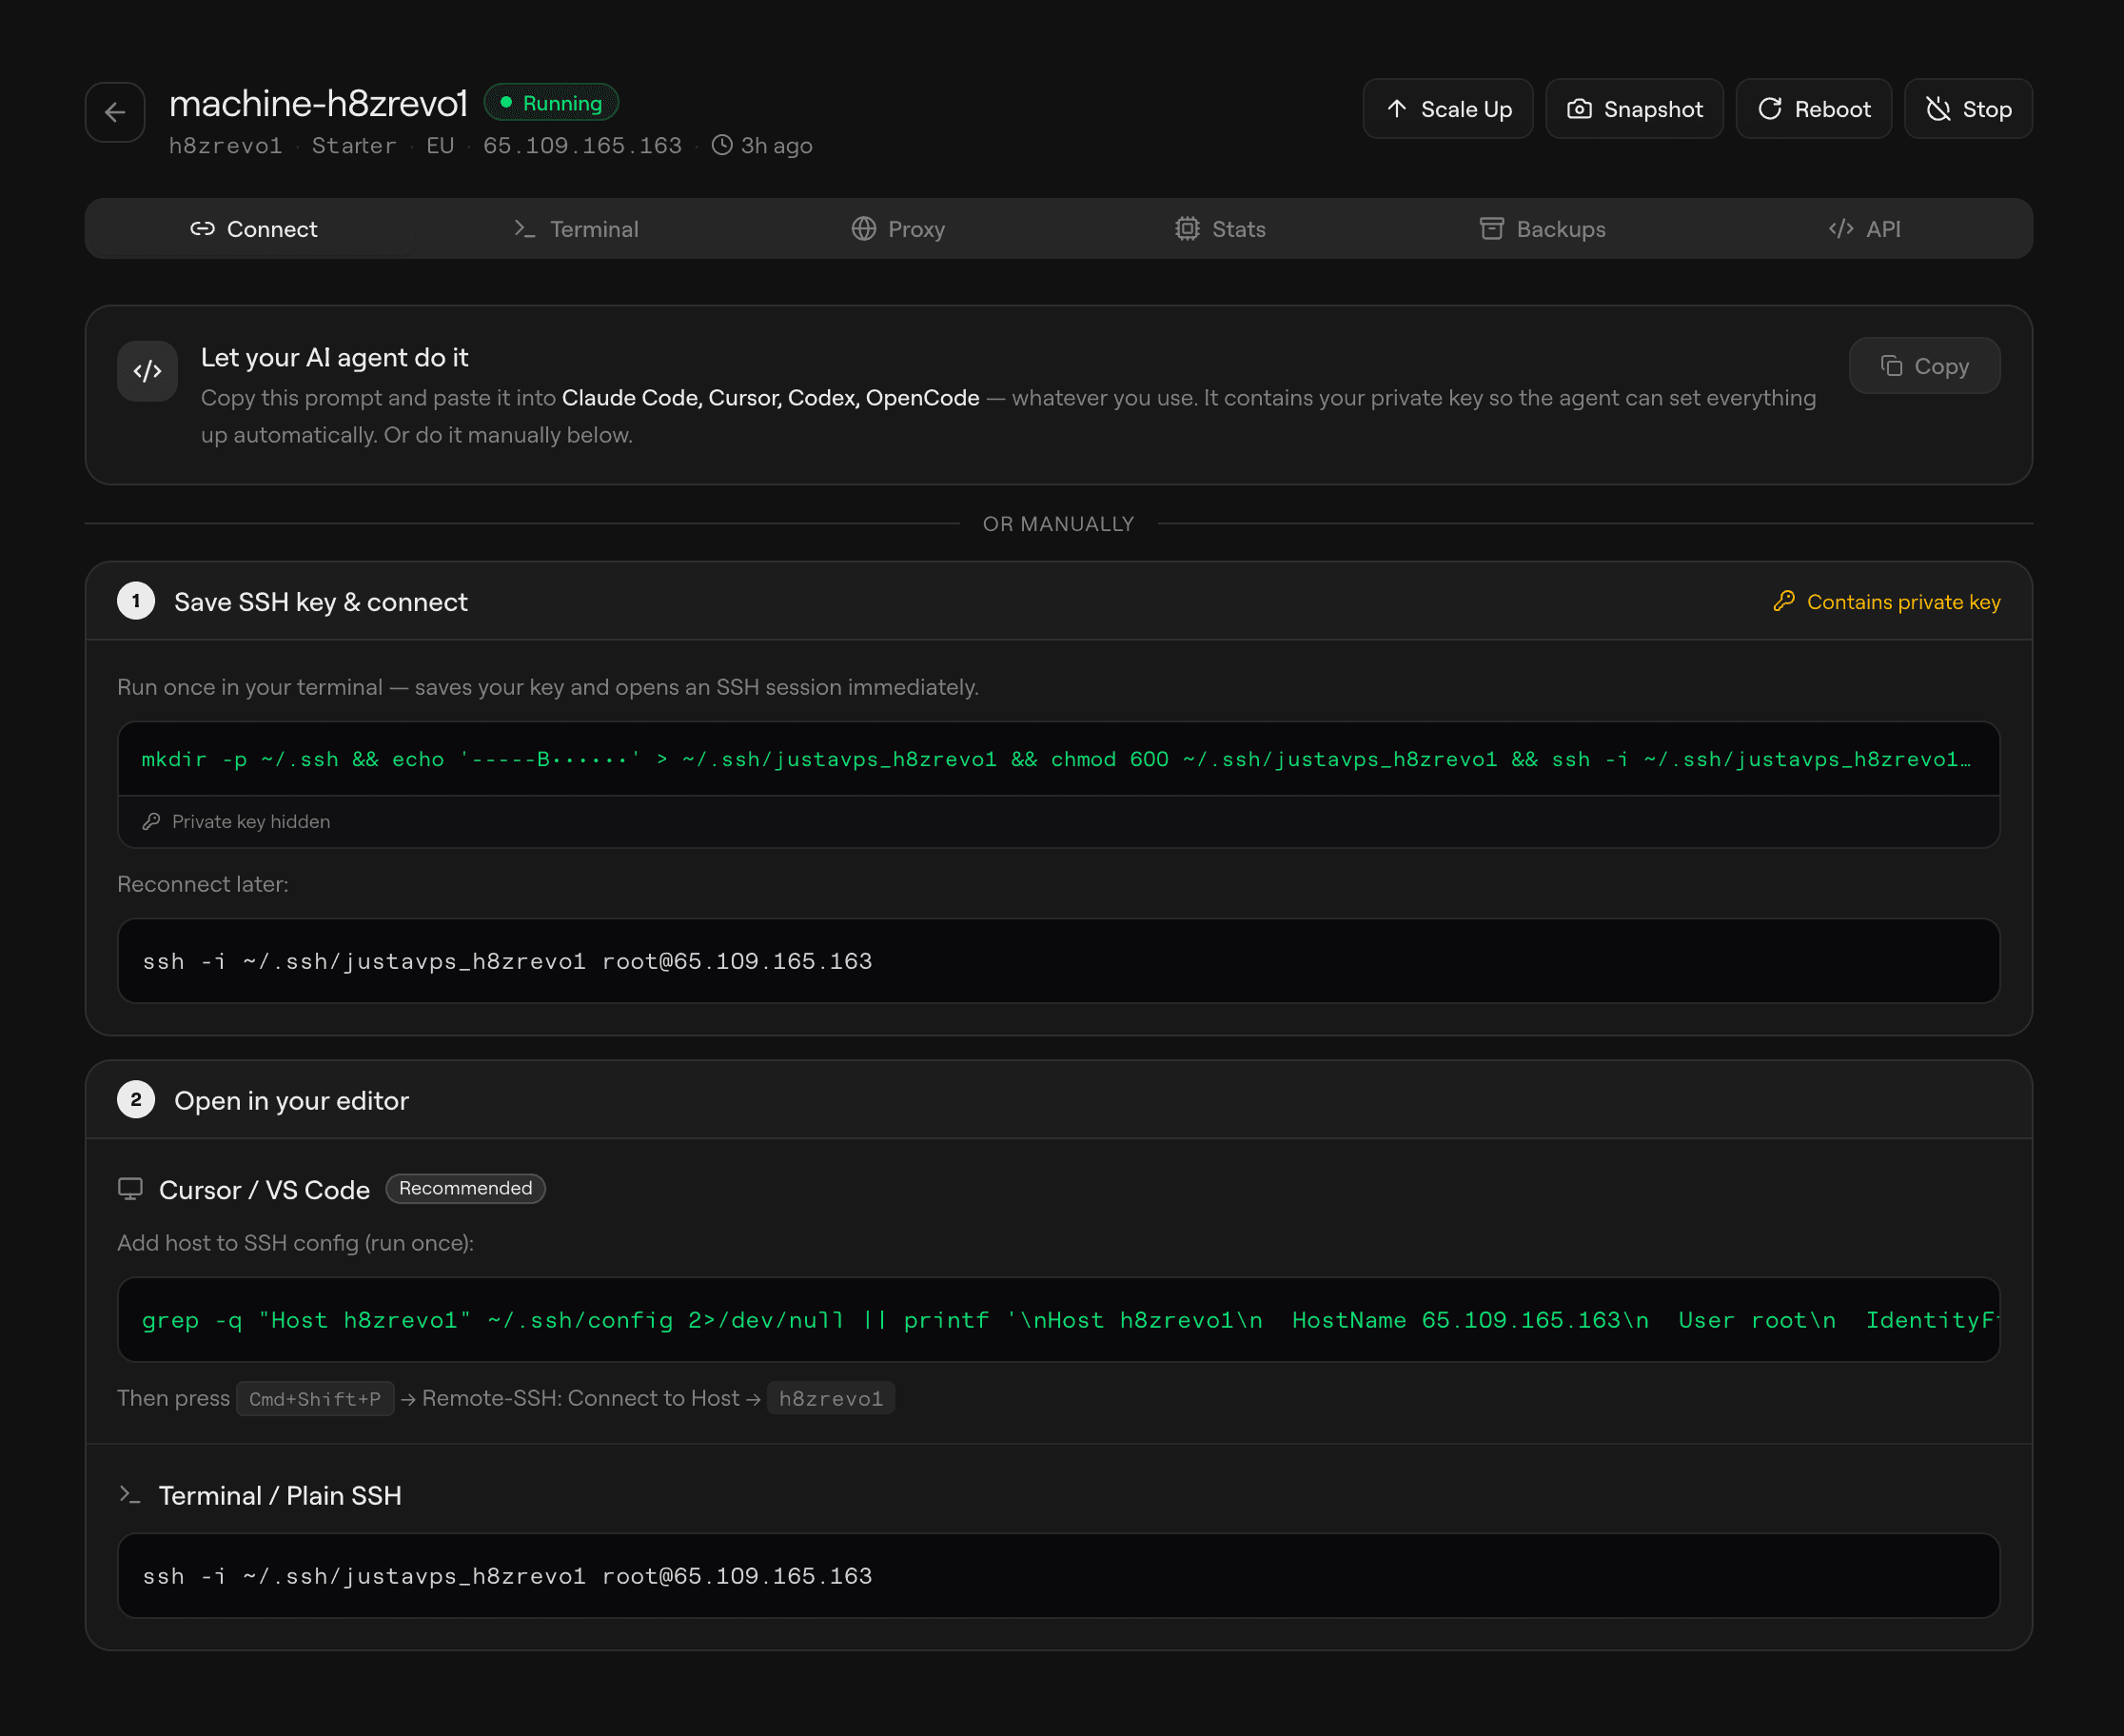
Connect
Open the Connect tab on your machine page. It walks you through saving your SSH key, adding the host to your config, and connecting — all with click-to-copy commands.
Personal Use#
Use your machine as a remote dev environment. SSH in, connect your IDE, and let your AI agents run 24/7 while you close your laptop. Come back tomorrow — everything's still there.
ssh, new ports are detected automatically and you get the correct public forwarded URL right in the terminal.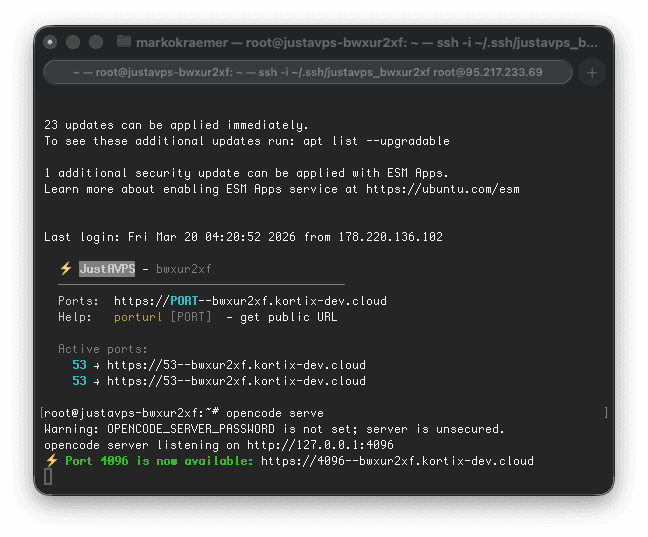
That means you can simply connect over SSH, start any service, and keep working. As soon as a port opens, JustAVPS advertises the matching forwarded URL automatically, so there's no extra tunneling or manual proxy setup to think about.
Connect from Cursor / VS Code#
Use Remote-SSH for a local-feeling experience in your editor:
- Run the one-click setup command from the dashboard (saves your SSH key)
- Add the host to
~/.ssh/config— the dashboard shows the exact config block to copy - Cmd+Shift+P → Remote-SSH: Connect to Host → select your machine
ssh.Connect Directly with SSH#
You do not need a special client to get a good experience. Copy the SSH command from the dashboard, connect from any terminal, and JustAVPS will watch the machine for newly opened ports while you work.
ssh -i ~/.ssh/justavps_mybox root@95.217.x.x- OpenCode, web apps, previews, dashboards, and custom services are all detected automatically
- Every listening port gets a matching public forwarded URL
- The SSH session prints the forwarded URL immediately, so you can click it and keep going
Run AI Agents#
Your machine comes pre-installed with popular AI coding agents. SSH in and run any of them directly from the CLI.
opencodehttps://<slug>.kortix.cloudIf you run your own HTTP service on a custom port, JustAVPS automatically exposes the corresponding proxied port URL and prints it in your SSH session.
https://{port}--{slug}.kortix.cloud. This happens automatically for all listening ports, including when you connected with plain ssh and never opened an editor.Access from Mobile#
Open the machine URL from the dashboard in any mobile browser, or use the dashboard web terminal for quick shell access.
Infrastructure Use#
Build on JustAVPS as a platform. Create machines, manage files, run bash, and launch coding agents — all programmatically. One REST API, Python SDK, and TypeScript SDK.
API & SDKs#
One REST API with full coverage — machines, filesystem, process execution, images, and coding agents. Available via REST, TypeScript SDK (@kortix/justavps), and Python SDK (kortix-justavps).
Generate an API key in the dashboard under Keys (prefix sk_live_). Quick test:
curl https://justavps.com/api/v1/machines -H "Authorization: Bearer sk_live_xxx"| API Surface | What You Can Do |
|---|---|
| Machines | Create, list, get, resize, rebuild, delete |
| Filesystem | Read, write, upload, download, search, replace, mkdir, move |
| Process | Exec commands, stream output (SSE), run code snippets, list, kill |
| Images | List templates and saved images, create images from running machines, delete your own saved images |
| Coding Agents | Run Claude Code, OpenCode, Codex — unified API with session management |
The API reference has everything — full endpoint docs, request/response schemas, and interactive SDK examples in both TypeScript and Python:
Templates And Images#
Every machine boots from an image. JustAVPS uses two kinds: built-in templates managed by the platform, and private images you create from your own running machines.
Built-in Templates#
Built-in templates appear in Images as templates and cannot be deleted from the dashboard.
| Template | Description |
|---|---|
| justavps standard | Default base image used for new machines |
The default justavps standard template includes the platform services needed to connect and run workloads:
| Software | Details |
|---|---|
| Ubuntu 24.04 LTS | Base OS |
| justavps-daemon | Primary machine service on port 80 |
| opencode-web | Started by the opencode-web service |
| sandbox-agent | Coding-agent API on port 2468 |
| Docker | Used for workload containers and Docker-image boot flows |
| SSH key auth | Root login via keys only; password auth disabled |
Storage is persistent across reboots, and automatic backups are enabled by default on new machines.
Coding Agents API#
Every machine ships with sandbox-agent pre-installed — a unified API for running Claude Code, Codex, OpenCode, PI Coding, and other coding agents over one consistent interface.
- Universal Agent API — one interface to run any supported coding agent
- Session management — create, resume, and manage agent sessions
- Streaming events — real-time output via SSE
- Universal schema — standardized events for tool calls, permission requests, file edits, and more
- Runs inside any sandbox — lightweight static binary that also works in Docker, E2B, Daytona, and Vercel Sandboxes
import { SandboxAgent } from "sandbox-agent";
import { local } from "sandbox-agent/local";

const client = await SandboxAgent.start({
  sandbox: local(),
});

await client.createSession("my-session", {
  agent: "claude-code",
});

await client.postMessage("my-session", {
  message: "Hello, world!",
});

for await (const event of client.streamEvents("my-session")) {
  console.log(event.type, event.data);
}
Agent Sessions covers the full session lifecycle — create sessions, send messages, persist transcripts, and replay or audit every event. sandbox-agent runs on port 2468 by default.
Your Own Images#
Create a private image from any running machine when you want to preserve installed dependencies, cloned repos, custom toolchains, or customer-specific setup. These bootable images appear in Images under your account.
curl -X POST https://justavps.com/api/v1/machines/{machine_id}/image -H "Authorization: Bearer sk_live_xxx" -H "Content-Type: application/json" -d '{"name": "my-app-image"}'Poll GET /api/v1/images or GET /api/v1/images/{id} until the image status becomes ready, then pass its image_id when creating a new machine.
curl -X POST https://justavps.com/api/v1/machines   -H "Authorization: Bearer sk_live_xxx"   -H "Content-Type: application/json"   -d '{
    "provider": "cloud",
    "server_type": "pro",
    "region": "hel1",
    "image_id": "<template-image-id>"
  }'
Use image_id for built-in templates or your own saved images.
Security#
Access is centered around the authenticated proxy plus SSH-key-only login. The dashboard can reuse your session for browser access, and API keys work for programmatic requests.
Authenticated Proxy#
HTTP services on your machine are reachable through {port}--{slug}.kortix.cloud. For example, if your app runs on port 8000:
https://8000--abc123.kortix.cloudTwo ways to authenticate programmatically:
curl https://8000--abc123.kortix.cloud -H "Authorization: Bearer sk_live_xxx"https://8000--abc123.kortix.cloud?token=<jwt>Or just log in to the dashboard — the proxy issues a session-scoped cookie for browser access.
Authentication#
| Method | Use Case | Details |
|---|---|---|
| SSH Key | Personal — terminal, IDE | Key-based only, password login disabled. Key generated per machine. |
| API Key | Infrastructure — programmatic | Authorization: Bearer sk_live_* header. Manage in dashboard → Keys. |
| Web Session | Personal — dashboard, proxy | Session cookie set on login. Auth proxy recognizes it automatically. |
| JWT query param | WebSocket / iframe | ?token=<jwt> — for contexts where headers can't be set. |
Network Isolation#
Every machine is locked down by default. Only two ports are publicly reachable — everything else is blocked at the network level.
| Port | Access | Purpose |
|---|---|---|
| 22 (SSH) | Open from anywhere | Key-based SSH login only — password auth is disabled |
| 80 (HTTP) | Open from Cloudflare IPs only | The daemon — single authenticated entry point for all proxy traffic |
| All other ports | Blocked | Not reachable from the public internet |
This is enforced at three layers:
Firewall Layers#
| Layer | What It Does | Can Be Bypassed? |
|---|---|---|
| Cloud Firewall | External, provider-level firewall applied at provision. Only allows TCP 22 (anywhere) and TCP 80 (Cloudflare IPs). All other inbound traffic is dropped before it reaches the machine. | No — managed by the platform, not editable from inside the VM |
| UFW (in-VM) | Defense-in-depth. Denies all incoming traffic except SSH and port 80. | Technically yes (root can change it), but the Cloud Firewall still blocks externally |
| Docker ingress guard | iptables DOCKER-USER chain rule that blocks external traffic from reaching Docker-published ports, even if a container binds a host port. | No — survives Docker restarts and container recreation |
127.0.0.1 only. They are never directly accessible from the internet — all access goes through the authenticated daemon proxy on port 80.How Port Access Works#
Even though high ports are blocked publicly, you can still access any service running on your machine through the authenticated proxy:
- The Cloudflare Worker receives your request at
{port}--{slug}.kortix.cloud - It authenticates you (session cookie, API key, or JWT)
- It proxies to the daemon on port 80, which internally forwards to
localhost:{port} - The response flows back through the same chain
This means every port on your machine is accessible, but only through the authenticated proxy — never directly from the public internet.
Other Security Measures#
- TLS — handled at the Cloudflare edge for all proxied traffic
- SSH access — key-based only, password authentication disabled, root password locked
- Static IP — dedicated public IPv4 per machine
- Automatic backups — enabled by default on new machines
- No exposed databases — internal services (Postgres, Redis, etc.) are loopback-only
Access Control & Sharing#
Control who can access your machines and how. API keys with scoping and permissions for infrastructure, proxy tokens for sharing with anyone.
Scoped API Keys#
API keys can be scoped to specific machines and restricted to specific permissions. This lets you give a CI system or integration only the access it needs.
| Field | Description | Default |
|---|---|---|
| scope | "account" (full access) or "machine" (restricted to specific machines) | account |
| machine_ids | UUIDs of machines this key can access (required when scope=machine) | null (all) |
| permissions | Array: *, read, write, delete, exec, proxy | ["*"] |
| expires_in_seconds | Auto-expiration in seconds from creation (null = never) | null |
curl -X POST https://justavps.com/api/v1/api-keys \
  -H "Authorization: Bearer sk_live_xxx" \
  -H "Content-Type: application/json" \
  -d '{
    "name": "ci-readonly",
    "scope": "machine",
    "machine_ids": ["<machine-uuid>"],
    "permissions": ["read", "proxy"],
    "expires_in_seconds": 2592000
}'| Permission | Allows |
|---|---|
| * | Everything (default, backwards-compatible) |
| read | GET endpoints: list/get machines, images, server types, keys |
| write | POST/PUT/PATCH: create/update machines, images, filesystem writes |
| delete | DELETE: machines, images, keys |
| exec | Process execution: exec, code-run, coding agents |
| proxy | Access machine services through the CF Worker proxy |
scope=account and permissions=["*"] by default.Proxy Tokens#
Proxy tokens let you share temporary access to a specific machine with anyone — no JustAVPS account required. Think "share a preview link."
| API Key (sk_live_xxx) | Proxy Token (pt_xxx) | |
|---|---|---|
| Who uses it | JustAVPS user (you, CI, integrations) | Anyone you share the link with |
| What it does | Full API access (scoped by permissions) | Proxy access only |
| Lifetime | Long-lived or custom expiry | Always expires (default 1h, max 7 days) |
| Scope | Account-wide or machine-scoped | Always single-machine, optionally port-scoped |
curl -X POST https://justavps.com/api/v1/proxy-tokens \
  -H "Authorization: Bearer sk_live_xxx" \
  -H "Content-Type: application/json" \
  -d '{
    "machine_id": "<machine-uuid>",
    "ports": [3000],
    "expires_in_seconds": 3600,
    "label": "design-review"
  }'
The response includes a proxy_url — share it directly. The recipient opens it in a browser, no login needed.
Two ways to use a proxy token:
- URL mode (shareable link) —
https://3000--slug.kortix.cloud?__proxy_token=pt_xxx - Header mode (programmatic) —
X-Proxy-Token: pt_xxx
curl -X DELETE https://justavps.com/api/v1/proxy-tokens/<token-id> \
  -H "Authorization: Bearer sk_live_xxx"
Custom Proxy#
You can run your own proxy server in front of JustAVPS to add custom authentication, branding, error handling, or domain routing. Your proxy acts as an intermediary between your users and the JustAVPS authenticated proxy.
The flow works like this:
- Your proxy receives a request from a user (e.g.
preview.yourcompany.com) - It determines which JustAVPS machine and port to target
- It creates a proxy token via the API (or reuses a cached one)
- It forwards the request to the JustAVPS proxy URL with the token in the
X-Proxy-Tokenheader - The response flows back through your proxy to the user
import express from "express";
import { createProxyMiddleware } from "http-proxy-middleware";

const JUSTAVPS_API_KEY = process.env.JUSTAVPS_API_KEY;
const JUSTAVPS_API_URL = "https://justavps.com/api/v1";
const PROXY_DOMAIN = "kortix.cloud";

// Cache proxy tokens per machine+port (reuse until near expiry)
const tokenCache = new Map<string, { token: string; expiresAt: number }>();

async function getProxyToken(machineId: string, port: number): Promise<string> {
  const cacheKey = `${machineId}:${port}`;
  const cached = tokenCache.get(cacheKey);
  if (cached && cached.expiresAt > Date.now() + 60_000) return cached.token;

  const res = await fetch(`${JUSTAVPS_API_URL}/proxy-tokens`, {
    method: "POST",
    headers: {
      Authorization: `Bearer ${JUSTAVPS_API_KEY}`,
      "Content-Type": "application/json",
    },
    body: JSON.stringify({
      machine_id: machineId,
      ports: [port],
      expires_in_seconds: 3600,
    }),
  });
  const data = await res.json();
  tokenCache.set(cacheKey, {
    token: data.token,
    expiresAt: new Date(data.expires_at).getTime(),
  });
  return data.token;
}

// Extract machine slug + port from incoming hostname
// e.g. "3000-my-machine.preview.yourcompany.com" → { slug: "my-machine", port: 3000 }
function parseHost(host: string) {
  const subdomain = host.split(".")[0];
  const [portStr, ...slugParts] = subdomain.split("-");
  return { slug: slugParts.join("-"), port: parseInt(portStr, 10) };
}

const proxy = createProxyMiddleware({
  router: async (req) => {
    const { slug, port } = parseHost(req.headers.host!);
    // Look up machine ID from slug (you'd cache this in production)
    const machineRes = await fetch(`${JUSTAVPS_API_URL}/machines`, {
      headers: { Authorization: `Bearer ${JUSTAVPS_API_KEY}` },
    });
    const { machines } = await machineRes.json();
    const machine = machines.find((m: any) => m.slug === slug);
    if (!machine) throw new Error("Machine not found");

    const token = await getProxyToken(machine.id, port);
    // Store token on request for the proxyReq handler
    (req as any)._proxyToken = token;

    return `https://${port}--${slug}.${PROXY_DOMAIN}`;
  },
  changeOrigin: true,
  ws: true,
  on: {
    proxyReq: (proxyReq, req) => {
      const token = (req as any)._proxyToken;
      if (token) proxyReq.setHeader("X-Proxy-Token", token);
      // Remove the platform API key — don't leak it to the machine
      proxyReq.removeHeader("Authorization");
    },
  },
});

const app = express();
app.use(proxy);
app.listen(3000, () => console.log("Custom proxy on :3000"));Key points for your custom proxy:
- Token caching — create a proxy token once and reuse it until near expiry. Don't create one per request.
- WebSocket support — proxy tokens work for WebSocket connections too. Pass the token via
X-Proxy-Tokenheader during the upgrade. - Port scoping — create tokens scoped to specific ports if your proxy only needs to forward certain services.
- Custom domains — point your DNS to your proxy server. Your proxy translates the custom domain to the correct JustAVPS machine URL.
- Error handling — handle 502/503 responses from JustAVPS with custom error pages (machine starting, port not listening).
- No leaked credentials — your API key stays in your proxy. Proxy tokens are short-lived and machine-scoped.
Billing#
Fixed monthly pricing per machine, region-specific specs with a simple flat rate.
| Plan | EU | US |
|---|---|---|
| Starter | 2 vCPU / 4 GB / 80 GB · $12.00/mo | 2 vCPU / 2 GB / 40 GB · $9.00/mo |
| Basic | 4 vCPU / 8 GB / 160 GB · $21.00/mo | 3 vCPU / 4 GB / 80 GB · $18.00/mo |
| Pro | 8 vCPU / 16 GB / 320 GB · $39.00/mo | 4 vCPU / 8 GB / 160 GB · $32.00/mo |
| Power | 12 vCPU / 24 GB / 480 GB · $56.00/mo | 8 vCPU / 16 GB / 240 GB · $60.00/mo |
| Ultra | 16 vCPU / 32 GB / 640 GB · $77.00/mo | 16 vCPU / 32 GB / 360 GB · $120.00/mo |
- Machine created → Stripe subscription starts immediately
- Machine deleted → subscription cancelled
- Machine resized → price updated with proration
Cancel anytime — no contracts, no lock-in. Manage billing, update payment methods, and view invoices in Billing in the dashboard.
Support#
- Email — support@justavps.com
- API Reference — justavps.com/api/docs
- Built by — Kortix